![]()
eSync in a Load Balanced Environment
Ektron CMS400.NET supports a load-balanced environment, in which several servers share your Web site’s processing load. This feature is explained in Balancing the Load on Your Servers.
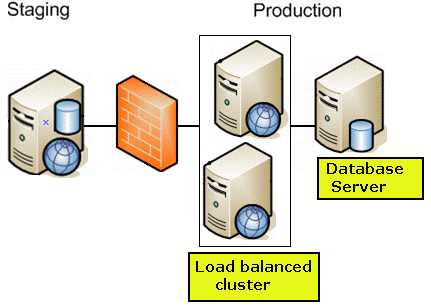
If your site uses load balancing, you can set up eSync such that, after one server in a load balance cluster is synchronized, the other servers will be automatically synchronized. Note that if a separate database server is outside the load balance cluster (as shown below), eSync only synchronizes documents and files used by the search among the clustered servers. It does not touch the database.
A typical load balanced cluster is below.
Warning! Ektron’s eSync feature does not synchronize all databases in a SQL database cluster. If you have such a configuration, it is your responsibility to ensure that eSync updates all the databases.
Warning! In a load balanced environment, only update templates on the staging server. Do not update them on the production server and assume they will be synchronized with the staging server.
Warning! Assume your load balanced cluster consists of two staging servers (S1 and S2) and two production servers (P1 and P2).
If you add/modify/delete a file on S1, to get the file to S2, you must run either a download sync on S2, or an upload sync on S1, or a bidirectional sync from either server. If you run a download sync on S2, you also need to run an upload sync to push the file to P2, which will then Load Balance with P1.
The best way to make sure that the added/modified/deleted file is changed on all servers is to initiate the sync from the server on which the file was changed. In this example, since you changed the file on S1, if you initiate a sync from S1, it will be automatically updated on S2, P1, and P2.
Prerequisites
The connection string on all servers in the cluster match
You must initiate eSync relationships, and the actual synchronization, from a staging server
If your staging servers are clustered, you must remove one from the cluster before you can sync
Follow these steps to set up this capability.
Install a Min Site on Every Server in the Cluster
Update the Assetmanagement.config File
Update the Ektron Windows Service Config File
Create eSync Security Certificates for a Load Balanced Cluster
Install a Min Site on Every Server in the Cluster
1. Upgrade each server to the same version of Ektron CMS400.NET. If Ektron CMS400.NET is already installed to one server, you can install a minimum site on the other servers.
2. To do this, run the Ektron CMS400.NET base installation file (CMS400Base8x.exe). For more information, see the Ektron CMS400.NET Setup manual.
3. If the current site with which you will sync is precompiled, you must also precompile all min sites.
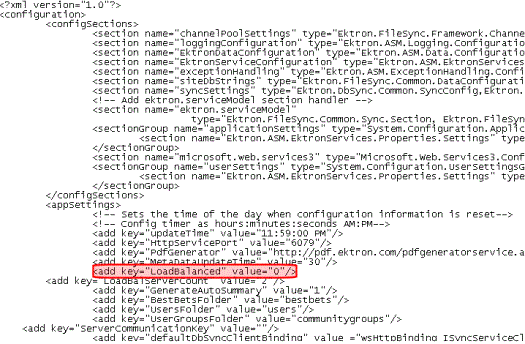
Update the Assetmanagement.config File
1. Sign on to the first server in your load balanced cluster.
2. In the site root folder, open site root\assetmanagement.config.
3. Change the value of LoadBalanced to 1 and save.
4. Do this on every server in the cluster.
Update the Ektron Windows Service Config File
1. Sign on to the first server in your load balanced cluster.
2. Open C:\ProgramFiles\Ektron\EktronWindowsService
3. Change the value of LoadBalanced to 1 and save.
4. Do this on every server in the cluster.
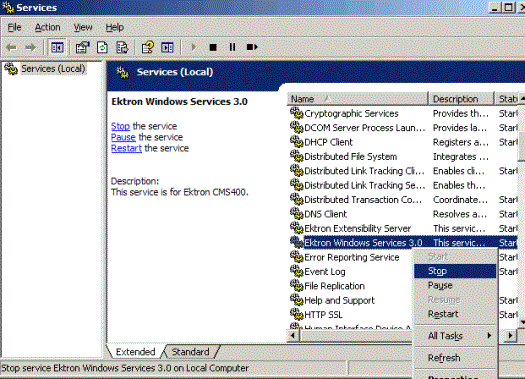
5. Stop and then Start the Ektron Windows Service on every server in the cluster.
Create eSync Security Certificates for a Load Balanced Cluster
You should be familiar with eSync security certificates before beginning this procedure. If you are not, read the following section: Managing eSync Security Certificates.
Assume the load balance cluster has three servers: mach1, mach2, and mach3.
This procedure has two major parts.
Generating Security Certificates on mach1.
Applying Security Certificates to mach2 and mach3
Generate Security Certificates on mach1
In the first nine steps, you copy mach1’s security certificate files, then paste them into the same folder, and rename them beginning with mach2 and mach3.
1. Sign on to mach1 and generate security certificates. To do this, click the Windows Start Button> All programs > Ektron > CMS400 v8x > Utilities > Security Configurator.
2. The security configurator screen appears.
3. See Use the following table to complete this screen..
4. Click Generate Certificates then click OK. This action creates security certificates on mach1.
5. On mach1, open the following folder: C:\ProgramFiles\Ektron\CMS400v8x\Utilities\Software\SecurityConfigurator.
6. Copy the following files.
mach1_SyncClient.pfx
mach1_SyncClient.pvk
mach1_SyncClient.cer
mach1_SyncServer.pfx
mach1_SyncServer.pvk
mach1_SyncServer.cer
7. Paste them into the same folder.
8. Rename each file according to the following pattern: mach2_file name. (This assumes the second server in your load balance cluster is mach2.)
9. Repeat steps 7 and 8 for every server in your load balance cluster. So the number of certificate files in the folder is 6 x the number of servers.
10. Copy all security certificate files to the following mach1 folder: C:\Program Files\Ektron\EktronWindowsService
11. Stop and start the Ektron Windows Service.
In the second part of this procedure, you
open the Ektron.ASM.EktronServices30.exe.config file
copy mach1’s certificate’s key value
create new keys, and apply mach1’s encoded value to them
So, when you finish, the affected part of the file looks like this:
<add key="mach1_SyncClient.cer" encodedValue="MIIB7TCCAVag....
<add key="mach2_SyncClient.cer" encodedValue="MIIB7TCCAVag....
<add key="mach3_SyncClient.cer" encodedValue="MIIB7TCCAVag....
Note: The encodedvalue above is abbreviated to fit the page.
12. Open the following file:
C:\Program Files\Ektron\CMS400v8x \Utilities\EWSUpdates\3.0\Ektron.ASM.EktronServices30.exe.config
13. Find the <publickCertKeys> element.
14. Following that line is the encoded certificate value for mach1, which looks something like this.
<add key="mach1_SyncClient.cer" encodedValue="MIIB7TCCAVag....
Note: The encodedvalue above is abbreviated to fit the page.
15. Copy the entire <add key> element, including the value, into the Notepad file.
16. Open a text processing application like Notepad.
17. Into the Notepad file, paste the text you copied in Step 13 three times.
18. Change the second line’s add key value to mach2_SyncClient.cer.
19. Change the third line’s add key value to mach3_SyncClient.cer.
20. Copy the second and third lines of the Notepad file (the lines you just changed).
21. Return to the Ektron.ASM.EktronServices30.exe.config file.
22. Locate the <add key> element.
23. Place the cursor directly below that line.
24. Paste the text you copied in Step 18.
25. Save the Ektron.ASM.EktronServices30.exe.config file.
Apply Security Certificates to mach2 and mach3
1. On the local server, open two Windows Explorer windows: one showing the mach1’s file system, and the other showing the mach2’s file system.
2. In the mach1 window, open C:\Program Files\Ektron\EktronWindowsService
3. Copy all security certificate files in that folder.
4. In the mach2 window, open the following folder: C:\Program Files\Ektron\EktronWindowsService
5. Paste all security certificate files you copied in Step 3 to that folder.
6. Stop and start the Ektron Windows Service.
7. In the mach2 window, create a folder underneath the root folder. Name it Ektron Security Certificates.
Warning! Do not place it under the web root folder, C:\inetpub\wwwroot.
8. Return to the mach1 window, which is still open to the following folder: C:\Program Files\Ektron\EktronWindowsService
9. Copy the following files.
Warning! Copy - do not move - the files from the mach1 folder.
mach2_SyncClient.pfx
mach2_SyncClient.pvk
mach2_SyncClient.cer
mach2_SyncServer.pfx
mach2_SyncServer.pvk
mach2_SyncServer.cer
10. Paste the files into the mach2 folder you created in Step 6. Make sure there are no other security files in the folder.
Next, you need to register and move the files to the correct folders. The Security Configurator screen does this.
11. On mach2, open the security configurator screen using this path: Windows Start Button > All programs > Ektron > CMS400 v8x > Utilities > Security Configurator.
12. The security configurator screen appears.
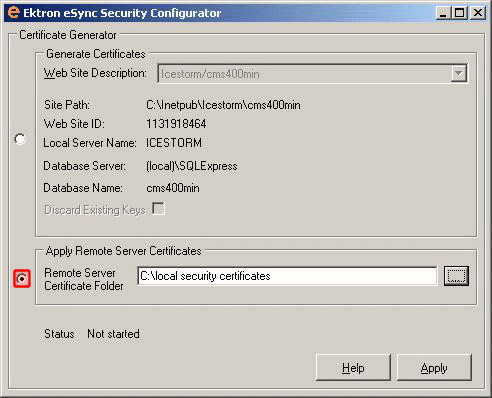
13. Click the Apply Remote Server Certificates radio button (circled above).
14. Click the browse button next to that field.
15. Browse to the folder to which you pasted the security certificates in Step 9.
16. Click OK .
17. The utility copies the security certificates you pasted in Step 9 to the correct folder, and configures them for the remote server.
18. Repeat the above steps for every server in the load balance cluster. Note that the files to be copied will start with the server name you’re currently setting up.
Setting Up and Running eSync
You set up and run eSync in a load balanced environment the same way you run it normally. See these sections for details.
Using eSync to Initialize a New Site
Optional Steps before Running a Sync
Note: If your first load balanced sync fails, you must run the Search Config Utility on the load balanced server in order for search to work. See Also: Automatically Recreating a Catalog


![]()